fueling the soul with happiness, creativity, & productivity one mile at a time

Showing posts with label DIY Projects. Show all posts

Saturday, August 5, 2017

Travel Activites for Kids from The Dollar Tree to DIY!

Long trips in the car can go two ways- Stressful or Fun! I dont know about you but FUN sounds way better to me! To help pass time for our 20 plus hour journey in a vehicle I prepped by making activities for the kids.

Heres some super simple and inexpensive ideas that will keep those little minds busy!!!

1- DIY Geo Board
I purchased push tacks, bag of rubber bands and clear zipper pencil holder at the dollar tree. I found a piece of wood in the garage and spray painted it white. Using a ruler make 1-2 inch spaces and mark with a pencil. Take the push pin and gently hammer/rubber mallet it in and TADA!!! This was used the entire trip!


2- Dollar Tree metal baking sheets, magnets, and dry erase markers. Clip your artwork for easy coloring, color directly on it with dry erase markers or play with magnets! It can also be used for a tray when eating on the go!

I purchased clear zipper pencil holders to hold the markers and magnets. The Dollar Tree has some awesome activity books that have mazes, seek and finds and connect the dot pages. Either have them color directly on it or put it in a clear page protectors and use dry erase markers!


3- LEGOS. A small bin from the Dollar Tree filled up with legos. It can sit on the seat and the kids will be occupied by building their projects right on the dollar store baking sheet!!


4- Dollar store puzzles in a zipper holder. You can even stick magnets on the back of the pieces so they don't fall off.


5- Little totes. These make AWESOME snack holders! Keeps the wrappers off the floor and the treats within reach!


I put all the activities in clear zipper pencil holders and kept them together with a clip. It reduced pieces and toys flying all over the vehicle!

Hopefully some or all of these tips help you keep your littles occupied on your next adventure!!!


Tuesday, August 16, 2016

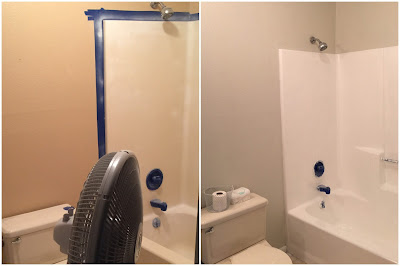
Bathroom remodel for under $200


Looking to update your bathroom and not burn a hole in your wallet? These super easy and clever ideas will save you loads of money and create a complete makeover!
 Are you ready???


 Countertop and Sink

SPRAY PAINT!! Yes yes seriously people, spray paint! I started with a quick sand to remove the debris of yuck. Then sprayed it with a rustoleum primer. Once that was dried (rather quickly) I sprayed the counter top with Rustoleum Stone spray paint. I did multiple light coats to ensure an even spray. (Follow the directions on the can!) Then I covered it with a water based self leveling rustoleum polyurethane. I let it cure for 5 days and then brought it in. So far it is holding up beautifully and this bathroom has lots and lots of use!!!


Vanity
I decided to strip the doors because there was about 6 layers of paint. I repainted it with chalkboard white. I placed foam/wood trim on the cabinet doors and replaced the knobs.


Floor
This is plank peel and stick flooring from Walmart online! We used two boxes and it was SO EASY to get in!


Fixtures

ALL the fixtures including the shower rod were spray painted with Rustoleum metal spray paint. Only took two cans to do all the fixtures, outlet covers, and lights! Looks awesome!

Toilet

We love our neighborhood ReStore and found a new water efficient toilet for $20.00!


Shower

Easy peesy- updated the entire thing with Rustoleum tub and tile kit. I highly recommend opening every window in your house and where a mask because this stuff stinks!!!


Walls, Trim a Backsplash

I painted the walls in Benjamin Moore Going to the Chapel and trim and doors with white paint from home. The backsplash I found on Amazon which is a super easy peel and stick that looks lovely!


                                                                 Decor


 Mirror I found at Hobby Lobby 50% off. It was copper colored so I painted it with the chalk paint that I used on the vanity.


  •  I purchased frames from the dollar store and found some fabulous free prints on Pinterest. I printed them on cardstock (purchased at target) from my home printer. 
  • The three shelves I purchased at Goodwill and repainted black. 
  • The shower curtain was purchased at TJ Maxx for $14.99  


When everything was said and done the total spent was $198.74!

Super cute update and I didnt spend a fortune!! 

Monday, August 15, 2016

DIY Bonfire Chairs


This past weekend my husband, our awesome neighbors and myself took down 7 trees that were horribly placed in my yard. My yard is fairly small and these trees seriously over took it! One particular tree (Pine tree) was my LEAST favorite. It destroyed my grass and would leave needles every where!!

ALL the trees are being used for other purposes and the least favorite tree was re-purposed into something that I LOVE (gotta keep things positive, right?!)

My bestie neighbor and I hunted free old wooden chairs during our citywide bulky pickup. We scored seven awesome chairs! YES!!!

The chair legs were removed with tools and girl power. Then they were beautifully spray painted various bright colors and set to dry. Once they were dry they were placed on the logs from the pine and were secured with 3 inch screws.

These chairs are awesome!! This gathering area on the property line of our yards and is now complete with the additional of a free metal fire pit.

Super easy! Not a dime was spent! Year and years of enjoyment and laughter is underway!

Thursday, June 30, 2016

Ugly outlet cover to beautiful with ONE DOLLAR!

So lets face it, your outlet covers are those 79 cent cheapo beige covered ugliness right? Well, SO ARE MINE! Why on earth would someone spend 5+ dollars on a OUTLET COVER?

You want to make them look expensive and super cute on your wall then keep reading :)


Head over to the dollar store and pick up a roll of contact paper. 

Their contact paper is great! The designs are always changing and they seem to keep up with the popular decor trends.
  
I found this gray and white pattern & it goes great with my recent living room repaint 
( Sea Mink by Benjamin Moore)


Now lets get to the super fun and easy up do! 

Take the cover off the wall ( don't loose your screws!). Flip it over and cut out enough that it can easily fold over the cover.


Fold the corners in first then the sides. When you fold over the sides make sure to pull it taunt so you don't get air bubbles. 


Use a box cutter or sharp razor blade to cut of the excess paper inside leaving just enough that it covers the inside lip. 


Flip it over and cut slits where the plug will rest. Start by making a slice in the "corners"


Use your fingers to mold the contact paper towards the inside. Make a small cut in the screw hole and push the screw through. 


Turn it over and cut off any excess. And WA-LAH! 


Your new beautiful outlet cover is ready to dazzle your wall! 


Monday, June 20, 2016

Recycled Bird Feeder for Kids

Summer is here in Wisconsin!! YAY!! I love that we are finally able to enjoy the heat and the sounds of birds happily chirping in the morning.

I wanted to do a fun art activity with my daughter. I noticed that our yard was missing something important, a bird feeder!! We thought of some cool things to use that could hold the seed and we chose to use an empty milk jug.


This is perfect for a feeder. The indents on the plastic jug are the perfect size/shape to cut out. We cut out two holes and went on a hunt for sticks.


We made small holes and pushed the sticks all the way through so that they were on each side and criss crossed in the middle.

On too decorations! We used craft super glue to make a wood roof. This was her idea and I think it adds a little home cuteness to the project! Then we colored away with sharpie permanent paint markers.


Once the glue was nice and dry I punched two holes through the top and fed through some thick twine that we found in our garage (love finding treasures!)


We added bird seed and hung in the tree that we can view from our kitchen window.

 It has been a few weeks and the birds LOVE it. It is holding up nicely and it was such a fun project to do!


Our children only grow up once. We should cherish the time we have with them! Be creative with each other and make your own bird feeder today! 


Sunday, May 29, 2016

DIY Kitchen Buffet


This old school long dresser has been in the basement for quite some time lacking purpose. With the lack of storage in my little kitchen I knew just what I had to do....
I had to REPURPOSE IT!!!! 


We decided to only keep one drawer since I don't have a lot of things that need drawers nor do I need any more junk drawers LOL.

The kitchen aid mixer had to be easily accessibly as well as my bowls and baking stuff.

Also, I seriously needed somewhere for my wine to go because I hate how it is just sitting on top of my fridge, it drives me nuts!


The drawers were removed and then we combined two of drawer spaces too make squares.

The remaining spaces we left open because they are perfectly sized for bowls,etc.

Hubby purchased a super sturdy board, cut the squares and shelves according to size.


I used wood fill to smooth out the dings and blend in the new shelving Kyle installed... then sanded some more!


I wanted to stain the top a dark color and then paint the rest of the piece to match my living room which is painted in Benjamin Moore's Silver Mink.


I sanded this piece ALOT! I used 50, 80, and 180 grit to remove the stain and make the top bare then smoothed it with some 220. I rough sanded the rest of the piece to make sure the paint would adhere well.


Finally it was time to stain and paint! I ended up only putting 1 coat of stain on the top and two thick coats of paint on the rest of the piece. Once it was cured then sealed it with some poly.


While I was painting it I decided to stain the small squares on the drawer instead of painting the whole thing. Although it was super tedious I am SO glad I did!


We let it dry for a few days in the garage. Then Kyle drilled a new hole for the new knob! It was finally time to move it in the house!


We brought it in and I filled it up with all our kitchen stuff. Its amazing on how much this thing holds!! I LOVE IT!!! Such a beautiful addition to my little kitchen! 


Sunday, May 22, 2016

DIY Kitchen Shelving


My poor little kitchen looked like it was being suffocated by cabinets. I wanted to create an more open feeling without loosing storage space while spending the least amount of money possible. 

The stove positioned alone on a small wall. Above there is a tall cabinet and an overhead cabinet. There is NO vent and the lighting is awful. My poor stove looked smothered!

 We wanted to add a range hood but not the kind that attached to the overhead cabinet which meant we were going to loosing the overhead cabinet

I really wanted a stainless steel wall mount. Kyle compared prices at our local retailers and they were all between $300-400.00. There is NO way we are spending that! I could spend LESS than that on the entire project! 

We searched Amazon and found an awesome wall mount (check it out here) that was under $200! We ordered it and while we waited for it to arrive we chose to repaint the kitchen in revere pewter (best gray color ever!)

Kyle installed it and vented it outside and OHHHH it was heaven, so nice to not hear the sound of the smoke alarm when cooking bacon!


So now we had one cabinet next to the stove and this just looked silly. Something had to be done.. I remembered seeing a kitchen with open shelving on Pinterest, so I started drawing up my own design!

Open shelving here we come! 


I measured the wall and purchased the shelving on clearance at Menards. Truthfully the shelf supports were more expensive that ALL the shelving! I took the cabinet down and filled in the holes and touched up the paint. 


Since the boards were only sold in size 48 in, 36 in and 24 inch Kyle had to cut them (no biggie, especially for the price saving).

 So we cut and hung'em! And just to be safe,we used very heavy anchors for the shelves that were not placed in a stud. 


 It is perfect.  Our spices are currently in that little gray bin until I find little jars but we plan to put all of our spices on the lower left shelf which makes them super accessible.

The other shelves perfectly hold our glass bowls, strainers, and other cooking ingredients. We are also reusing the tall cabinet and making it into a lower cabinet next to the other side of the stove... (Pardon the living room wall paint, we are also repainting that room.)


It makes our kitchen look so much more open! I cant believe this inexpensive redo could make this big of a difference!
What a difference!!!!


When I was shopping for a recent wedding we attended, I found little glass jars in the $3.00 section at Target. And small jars for the spices I have a larger stock of at Dollar Tree. Now just need to make some labels!
Dollar Tree!! 
Target $3.00 for 5 talls & 4 rounds


I purchased 2 inch circle stickers for my labels. Avery Labels has FREE online templates that you can use. I am so happy with how they turned out!


We also plan to add some hanging wall storage above the stove to help save some counter space since we are lacking in that area. This post with definitely be updated!! Cant wait for my IKEA trip!!

Update! Wall storage is UP and I LOVE IT!!!

Next project- I am repurposing a long dresser into a kitchen buffet! Cant wait to share that one! Update- The buffet was finished follow the link above to see that beauty!!! 

Please leave me a comment if you have any questions or any further suggestions! I love hearing and seeing other DIYer's projects!!

Cheers!